GameBuilder Assets
Add Your Own Images
- Backgrounds: put files in
images/gamebuilder/bg. - Spritesheets: put files in
images/gamebuilder/sprites. - Then open GameBuilder and press the “Refresh Assets” button in the Assets panel.
The builder will discover your files via simple JSON manifests (recommended) or by directory listing (may not work on all hosts). Manifests ensure reliable detection on GitHub Pages.
Recommended: Manifests
- Backgrounds manifest:
images/gamebuilder/bg/index.json - Sprites manifest:
images/gamebuilder/sprites/index.json
Use these formats:
Backgrounds (index.json):
[
	{ "name": "Sky Kingdom", "src": "clouds.jpg" },
	{ "name": "Alien Planet", "src": "alien_planet.jpg" }
]
Spritesheets (index.json):
[
	{ "name": "Chill Guy", "src": "chillguy.png", "rows": 4, "cols": 3 },
	{ "name": "Tux", "src": "tux.png", "rows": 8, "cols": 11 }
]
Notes:
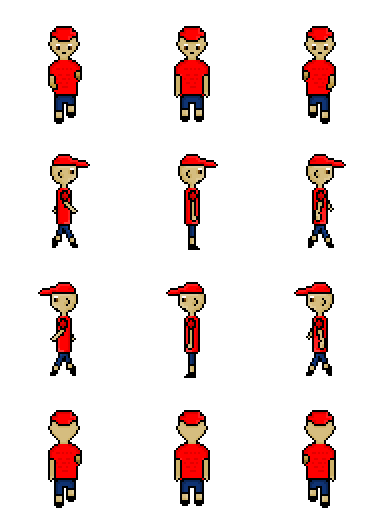
srccan be a filename (relative to the manifest folder) or an absolute path.rowsandcolsdefine the spritesheet grid; if omitted, defaults to 4x3.rowsandcolsmight be a little confusing. Use this as a guide; Chillguy’s spritesheet has 3 rows and 4 columns.
Example (Chillguy spritesheet):
- Supported image extensions: png, jpg, jpeg, gif, webp, bmp.
Using Your Assets in GameBuilder
- Click “Refresh Assets” to re-scan folders/manifests.
- Pick your background and sprite from the dropdowns.
- If the list shows duplicates, the builder de-duplicates by name automatically.
Troubleshooting
- If assets don’t appear, ensure manifests exist and paths are correct.
- For GitHub Pages, directory listing is disabled; manifests are required.
- After renaming or removing files, click “Refresh Assets” to update the lists.
Sprite Direction Mapping (down/left/up/right)
Not all spritesheets use the same row order for movement directions. The mapping shown in GameBuilder’s generated code is an example that works for the Chillguy sheet, but you should adjust it for your own sheet.
What to check
- Rows: the number of horizontal strips (top to bottom). Index starts at 0.
- Columns: frames per row (left to right). Index for
startalso starts at 0. - Directions: which row corresponds to
down,right,left,up(and optionally diagonals).
Steps to configure
- In your sprites manifest entry, set
rowsandcolsto match your sheet (e.g.,{"rows": 3, "cols": 4}). - In GameBuilder, select your sprite and press Confirm Step; then switch to Freestyle to edit code.
- Locate the
playerData(ornpcData) direction block and update therow,start, andcolumnsper your sheet. - Press Run to preview and iterate until animations look correct.
Example: Chillguy (3 rows x 4 cols)
This mapping is specific to Chillguy and should not be hard-coded for other sheets:
down:      { row: 0, start: 0, columns: 3 },
right:     { row: 1, start: 0, columns: 3 },
left:      { row: 2, start: 0, columns: 3 },
up:        { row: 2, start: 0, columns: 3 },
downRight: { row: 1, start: 0, columns: 3, rotate: Math.PI/16 },
downLeft:  { row: 2, start: 0, columns: 3, rotate: -Math.PI/16 },
upRight:   { row: 1, start: 0, columns: 3, rotate: -Math.PI/16 },
upLeft:    { row: 2, start: 0, columns: 3, rotate: Math.PI/16 },
Typical 4-row sheets (rows = 4, cols varies)
Many sheets use rows: 0=down, 1=right, 2=left, 3=up:
down:  { row: 0, start: 0, columns: 3 },
right: { row: 1, start: 0, columns: 3 },
left:  { row: 2, start: 0, columns: 3 },
up:    { row: 3, start: 0, columns: 3 }
Single-row idle sheets
For single-row sprites (e.g., idle only), use the same row and frame counts for all directions, or keep only down:
down: { row: 0, start: 0, columns: 1 }
Tips
- If your animation plays too fast or slow, adjust
ANIMATION_RATE. - If frames clip, verify
pixels.heightandpixels.widthmatch the image dimensions. - If diagonal movement looks odd, remove
rotateor tweak the angles.
Hitboxes (collision boxes)
Hitboxes define the rectangle used for collision, which can be smaller than the visible sprite. GameBuilder uses axis-aligned bounding boxes (AABB) and supports percentage-based reductions to trim the collision box inward symmetrically.
- Width reduction: trims from left and right equally by a fraction of the sprite width.
- Height reduction: trims from top and bottom equally by a fraction of the sprite height.
Example: hitbox: { widthPercentage: 0.10, heightPercentage: 0.20 } makes the collision box 10% narrower and 20% shorter than the sprite, centered inside the sprite.
Why adjust hitbox?
- Avoids colliding on transparent padding around sprites.
- Fine-tunes how “close” you can get to walls/objects before stopping.
Recommended starting point
- For precise edge collisions against barriers, start with
0.00for both. - If your sprite has empty margins, increase values slightly (e.g.,
0.05–0.15).
Editing the Player hitbox in GameBuilder
- Open GameBuilder → Assets → Player → Advanced.
- Under “Hitbox (collision box)”, set:
- Width Reduction (%) →
widthPercentage - Height Reduction (%) →
heightPercentage
- Width Reduction (%) →
- Press Confirm Step or Run to apply. The generated
playerDatawill include the hitbox values.
Notes:
- Values are fractions (0.00–0.90). Setting
0.30means 30% reduction total, split across both sides. - Larger reductions make the collision box smaller, allowing more visual overlap before a collision.