Computer Science Principles
Web Sockets
Introduction
Welcome to WebSockets. If you know some Python and JavaScript, you can now build apps that talk to each other live. Instead of just sending messages one at a time, WebSockets keep the connection open so the server and browser can share updates right away. This lets you make things like chat apps or live notifications that work without refreshing the page. Today, you’ll learn how to create a simple WebSocket server with Python and connect it to JavaScript on the browser.
Understanding Web Sockets
What are WebSockets?
Think of WebSockets like a phone line between your browser and a server that stays open, letting them talk back and forth anytime. Unlike regular web servers that only send or get messages one at a time, WebSockets keep the connection live so information can flow instantly both ways.
WebSockets vs. Regular Web Servers
You’ve seen how web servers like GitHub Pages or Flask send pages or data when you ask for them. WebSockets are different — they let your browser and server send updates to each other right away, without waiting for a new request.
Socket Server:
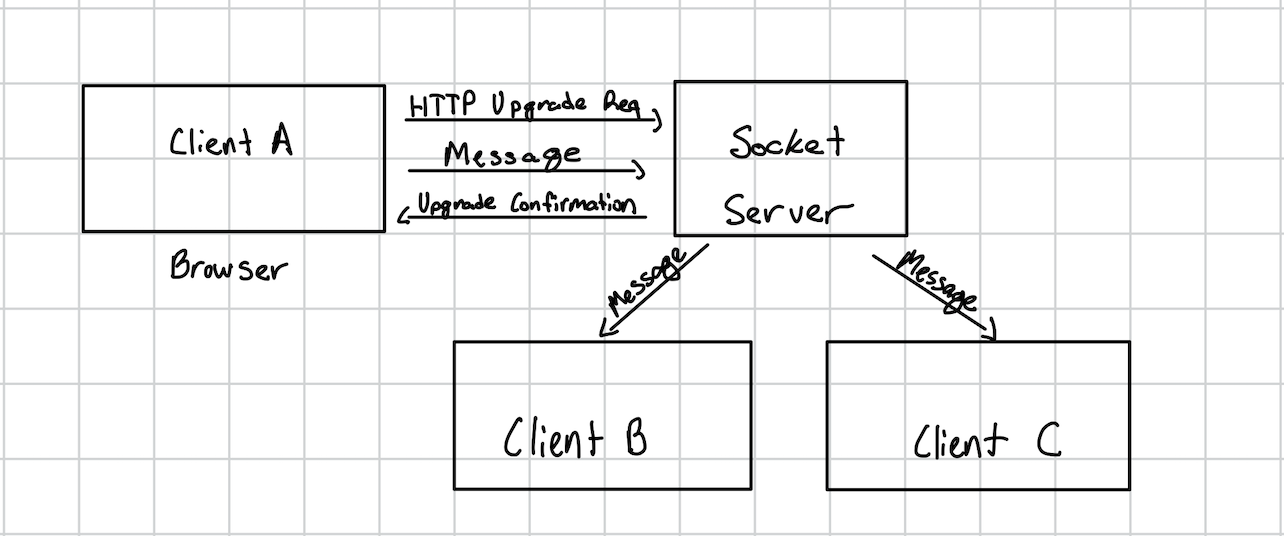
- Connection stays open
- Messages can flow freely both ways between server and multiple clients
- Client and server can send messages anytime
- Used for real-time apps like chat and live updates
Web Server:
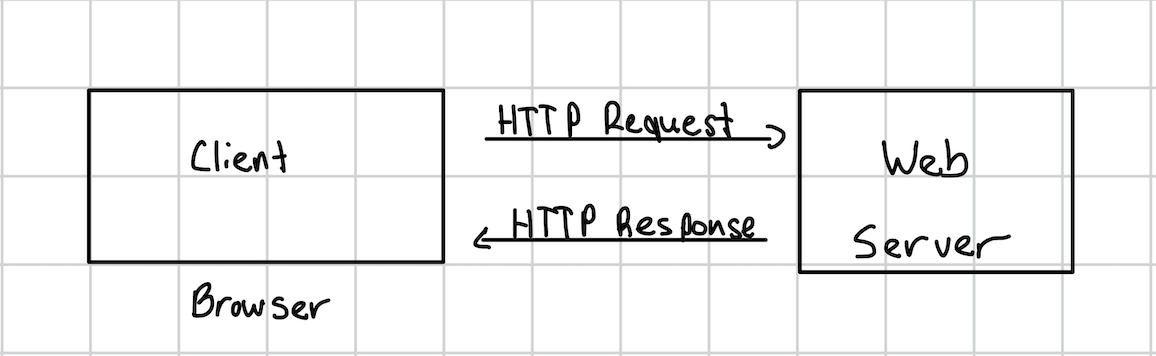
- Connection closes after each request
- New request must be made for additional data
- Request-response connections
- Serve webpages, APIs, static content
The WebSocket Framework
WebSockets work with both Python and JavaScript. In Python, you can use simple tools to create a WebSocket server, while JavaScript in the browser handles the connection and messages. Today, we’ll start with the basics of WebSockets and learn how to build live, interactive applications that update in real time.
Required Installations
These libraries let you run a Python WebSocket server and allow browser connections.
!pip install asyncio
!pip install websockets
Start Socket Server
This Python code creates a basic WebSocket server that sends a welcome message when a client connects and echoes back any message it receives.
import asyncio
import websockets

# Local message history to store past messages, bigger applications will likely use a database
message_history = []

async def echo(websocket):

    # Send a welcome message as soon as a client connects
    await websocket.send("Welcome to the WebSocket server!")


    # Loop through the message history and bring the client up to speed
    for msg in message_history:
        await websocket.send(f"Server echo: {msg}")


    # Listen for messages from the client
    async for message in websocket:
        print(f"Received from client: {message}")

        # Adds the message to the local history
        message_history.append(message)

        # Send back the same message to the client
        await websocket.send(f"Server echo: {message}")

async def main():
    # Start the WebSocket server on localhost port 8765
    async with websockets.serve(
        echo,
        "localhost",
        8765
    ):
        print("WebSocket server is listening on ws://localhost:8765")
        # Keep the server running forever
        await asyncio.Future()

# Run the server
asyncio.run(main())
API Request and Response
In a WebSocket-based project, the main purpose is to build a continuous channel for the data exchange. Unlike normal API endpoints that require a new request for each update, WebSockets keep the connection open.
- Client Request: The browser uses
ws.send()to send messages to the server at any time. - Server Response: The server receives messages and can instantly respond back using
websocket.send().
Response Handling
Once messages are received in the browser, JavaScript handles these updates live. Just like dynamic tables with data from an API, you can dynamically display incoming WebSocket messages.
Example Javascript Client with Live Updates Displaying on a Table
Here’s how your browser can connect to the WebSocket server created previously and send/receive messages.
<head>
  <title>WebSocket Client</title>
</head>
<body>
  <h2>WebSocket Live Messages</h2>
  <button id="sendBtn">Send Hello</button>

  <!-- 1) Table Markup -->
  <table border="1" style="margin-top: 20px;">
    <thead>
      <tr>
        <th>Message</th>
        <th>Timestamp</th>
      </tr>
    </thead>
    <tbody id="messageTable">
      <!-- JavaScript will add rows here -->
    </tbody>
  </table>

  <!-- 2) Client-Side JavaScript -->
  <script>
    const ws = new WebSocket("ws://localhost:8765");
    const table = document.getElementById("messageTable");

    ws.onopen = () => {
      console.log("Connected to server");
    };

    ws.onmessage = (event) => {
      const now = new Date().toLocaleTimeString();
      const tr = document.createElement("tr");
      const messageTd = document.createElement("td");
      const timeTd = document.createElement("td");
      messageTd.textContent = event.data;
      timeTd.textContent = now;
      tr.appendChild(messageTd);
      tr.appendChild(timeTd);
      table.appendChild(tr);
    };

    document.getElementById("sendBtn").onclick = () => {
      if (ws.readyState === WebSocket.OPEN) {
        ws.send("Hello from browser!");
      } else {
        console.warn("WebSocket is not open yet.");
      }
    };
  </script>
</body>
Ping/Pong Heartbeats
Sometimes, if you leave a WebSocket open without sending any messages for a while, the network might think it’s not being used and close the connection.
This can happen if the user’s internet drops, they go idle, or a firewall decides to shut it down to save resources.
To avoid this, servers and clients send little “pings” to each other, like saying:
“Hey, are you still there?”
If the other side is still alive, it replies automatically with a “pong” message, thus the name ping/pong
This allows the connection to exist regardless of messages being sent.
How is works:
- Server: Every few seconds, it sends a ping to the client.
- Client: The browser automatically replies with a pong.
- If no pong is received, the server knows the client is gone and closes that connection.
This is also called a heartbeat. It tells the server that the client is still “alive”.
Ping/Pong Heartbeats Application
This is the same server we created earlier. The only change here are the parameters to websocket.serve().
import asyncio
import websockets

# Local message history to store past messages, bigger applications will likely use a database
message_history = []

async def echo(websocket):

    # Send a welcome message as soon as a client connects
    await websocket.send("Welcome to the WebSocket server!")


    # Loop through the message history and bring the client up to speed
    for msg in message_history:
        await websocket.send(f"Server echo: {msg}")


    # Listen for messages from the client
    async for message in websocket:
        print(f"Received from client: {message}")

        # Adds the message to the local history
        message_history.append(message)

        # Send back the same message to the client
        await websocket.send(f"Server echo: {message}")

async def main():
    # Start the WebSocket server on localhost port 8765
    # ping_interval=10 means send a ping every 10 seconds
    # ping_timeout=5 means if no pong reply in 5 seconds, close the connection
    async with websockets.serve(
        echo,
        "localhost",
        8765,
        ping_interval=10,
        ping_timeout=5
    ):
        print("WebSocket server is listening on ws://localhost:8765")
        # Keep the server running forever
        await asyncio.Future()

# Run the server
asyncio.run(main())
To see the echo in action, save and run the server code. With the server running, open the client file in your browser and send messages.
Broadcast Server (Chat-Room Style)
Now that you know how to echo messages back to a single client, the next step is to broadcast any incoming message to all connected clients. This is how everyday chat-rooms are put into action.
How It Works
- We keep track of every client that connects in a
connectedset. - When a new message comes in from any one client, we loop through
connectedand send that message to everyone still open. - A new client is added when they do a
handshake, this is when the client asks to access the port that the server is listening on.
import asyncio
import websockets
from websockets.exceptions import ConnectionClosedOK, ConnectionClosedError

connected = set()
# Local message history to store past messages, bigger applications will likely use a database
message_history = []

async def broadcast(websocket):
    connected.add(websocket)

    # Send welcome message
    await websocket.send("Welcome! You’re now in the broadcast room.")

    # added: replay past messages to new client
    for msg in message_history:
        await websocket.send(f"Broadcast: {msg}")

    try:
        async for message in websocket:
            print(f"Broadcasting: {message}")

            # added: store message in history
            message_history.append(message)

            to_remove = set()
            for client in connected:
                try:
                    await client.send(f"Broadcast: {message}")
                except (ConnectionClosedOK, ConnectionClosedError):
                    # client already closed; mark for removal
                    to_remove.add(client)
            # remove any dead clients
            for dead in to_remove:
                connected.remove(dead)
    finally:
        connected.remove(websocket)

async def main():
    async with websockets.serve(broadcast, "localhost", 8765, ping_interval=10, ping_timeout=5):
        print("Broadcast server is listening on ws://localhost:8765")
        await asyncio.Future()  # run forever

asyncio.run(main())
Above is an example server for a chat room. Below are examples of 2 clients that show the server in action.
<html>
<head>
  <title>WebSocket Client</title>
</head>
<body>
  <h2>WebSocket Live Messages</h2>
  <button id="sendBtn">Send Hello</button>

  <table border="1" style="margin-top: 20px;">
    <thead>
      <tr>
        <th>Message</th>
        <th>Timestamp</th>
      </tr>
    </thead>
    <tbody id="messageTable">
      <!-- JavaScript will add rows here -->
    </tbody>
  </table>

  <script>
    const ws = new WebSocket("ws://localhost:8765");
    const table = document.getElementById("messageTable");

    ws.onopen = () => {
      console.log("Connected to server");
    };

    ws.onmessage = (event) => {
      const now = new Date().toLocaleTimeString();
      const tr = document.createElement("tr");
      const messageTd = document.createElement("td");
      const timeTd = document.createElement("td");
      messageTd.textContent = event.data;
      timeTd.textContent = now;
      tr.appendChild(messageTd);
      tr.appendChild(timeTd);
      table.appendChild(tr);
    };

    document.getElementById("sendBtn").onclick = () => {
      // Only call ws.send() after ws.onopen has fired.
      if (ws.readyState === WebSocket.OPEN) {
        ws.send("Hello from Client A!");
      } else {
        console.warn("WebSocket is not open yet.");
      }
    };
  </script>
</body>
</html>
<html>
<head>
  <title>WebSocket Client</title>
</head>
<body>
  <h2>WebSocket Live Messages</h2>
  <button id="sendBtn">Send Hello</button>

  <table border="1" style="margin-top: 20px;">
    <thead>
      <tr>
        <th>Message</th>
        <th>Timestamp</th>
      </tr>
    </thead>
    <tbody id="messageTable">
      <!-- JavaScript will add rows here -->
    </tbody>
  </table>

  <script>
    const ws = new WebSocket("ws://localhost:8765");
    const table = document.getElementById("messageTable");

    ws.onopen = () => {
      console.log("Connected to server");
    };

    ws.onmessage = (event) => {
      const now = new Date().toLocaleTimeString();
      const tr = document.createElement("tr");
      const messageTd = document.createElement("td");
      const timeTd = document.createElement("td");
      messageTd.textContent = event.data;
      timeTd.textContent = now;
      tr.appendChild(messageTd);
      tr.appendChild(timeTd);
      table.appendChild(tr);
    };

    document.getElementById("sendBtn").onclick = () => {
      // Only call ws.send() after ws.onopen has fired.
      if (ws.readyState === WebSocket.OPEN) {
        ws.send("Hello from Client B!");
      } else {
        console.warn("WebSocket is not open yet.");
      }
    };
  </script>
</body>
</html>
To see the chat-room in action, save and run the server code. With the server running, open the client files seperately to simulate users of the room in your browser and send messages.